Showing posts with label DIY. Show all posts

Monday, February 3, 2014

Bean's Sofia the First Birthday Party


 Bean wanted to have a Sofia the First birthday party this year. We knew of a local bakery that does birthday parties but we could not arrange a date that would work so on a suggestion by a co-worker we decided to do our own bakery party. This is where my fellow bloggers come in. So many bloggers are so generous to share their own projects and ideas and this year it really helped us with our party. I stole copied borrowed many great ideas found on Pinterest and through the magic of Google!

Going with the Sofia the First theme, I started looking around for invitation ideas.  I found a  a ton of Sofia party ideas at 3 Little Greenwoods.  I wish I could say I was also able to keep my party costs at $75 like she did but I couldn't.  Using the wonderful free Sofia the First party printables shared by Peonies and and Poppy Seeds, I made similar invites using ribbon I already had on hand.  I only had to purchase the sparkly cardstock for the backing paper of our invites and more envelopes.  Using a great coupon at Michael's,  I was able to put together our invitations for $9.


 I also used the foldable place cards to label our drink station and activities.  You can see one I made to display the Amulets of Avalor that I made after finding this great tutorial from Handmade Happy Hour.  I actually won a Mod Podge contest awhile back and it contained some of these Mod Podge Podgeable Shapes and some Mod Podge with glitter.  I had to purchase the gems for $2.34 at Hobby Lobby but I was able to use ribbon I already had on hand.


 The Welcome sign came from this set of free printables by Seven Thirty Three.  I wanted to make the welcome sign a little prettier but ran out of time so it got slapped onto a blank canvas with some glue dots.

Bean's cake was made by a wonderful lady named Bonnie who runs Bonnie's Cakes.  I found her through a fellow mom friend and come to find out after the party that Bonnie is friends with our aunt.  It's a small world!


We served "pink tea" a/k/a strawberry lemonade and water.  No food though.  Just cake and ice cream.

I don't have a picture of them but I used my Silhouette and cut out pink and purple tiaras that went on the water bottles.  I stole borrowed this idea from Catch My Party.  I found an idea on Etsy of dressing up plastic goblets for the pink tea.  Bean put Sofia stickers on each one and I tied the little bows.


After my friend suggested we do our own bakery party, I started looking for ideas on how to do this without it becoming some big huge mess.  We bought two jumbo muffin pans at Target and made our mini cakes the morning of the party.  Word of advice to anyone considering your own bakery birthday party - go to your grocery store bakery and ask if they will sell you some un-iced cupcakes instead.  We were afraid we hadn't made enough so Hubz went to our local Publix and was able to buy six for $2.50.  If I had known that beforehand I could have saved a lot of time and effort.

I found these cute cupcake boxes marked down at Five Below - $4 for a pack of 3.  I bought the cake decorations at Kroger, Target and Jo-Ann's.  On Pinterest, I stumbled across the idea for using paint palettes to hold the cake and the decorations.  Each princess got their own so there was little mess and no fighting over decorations.
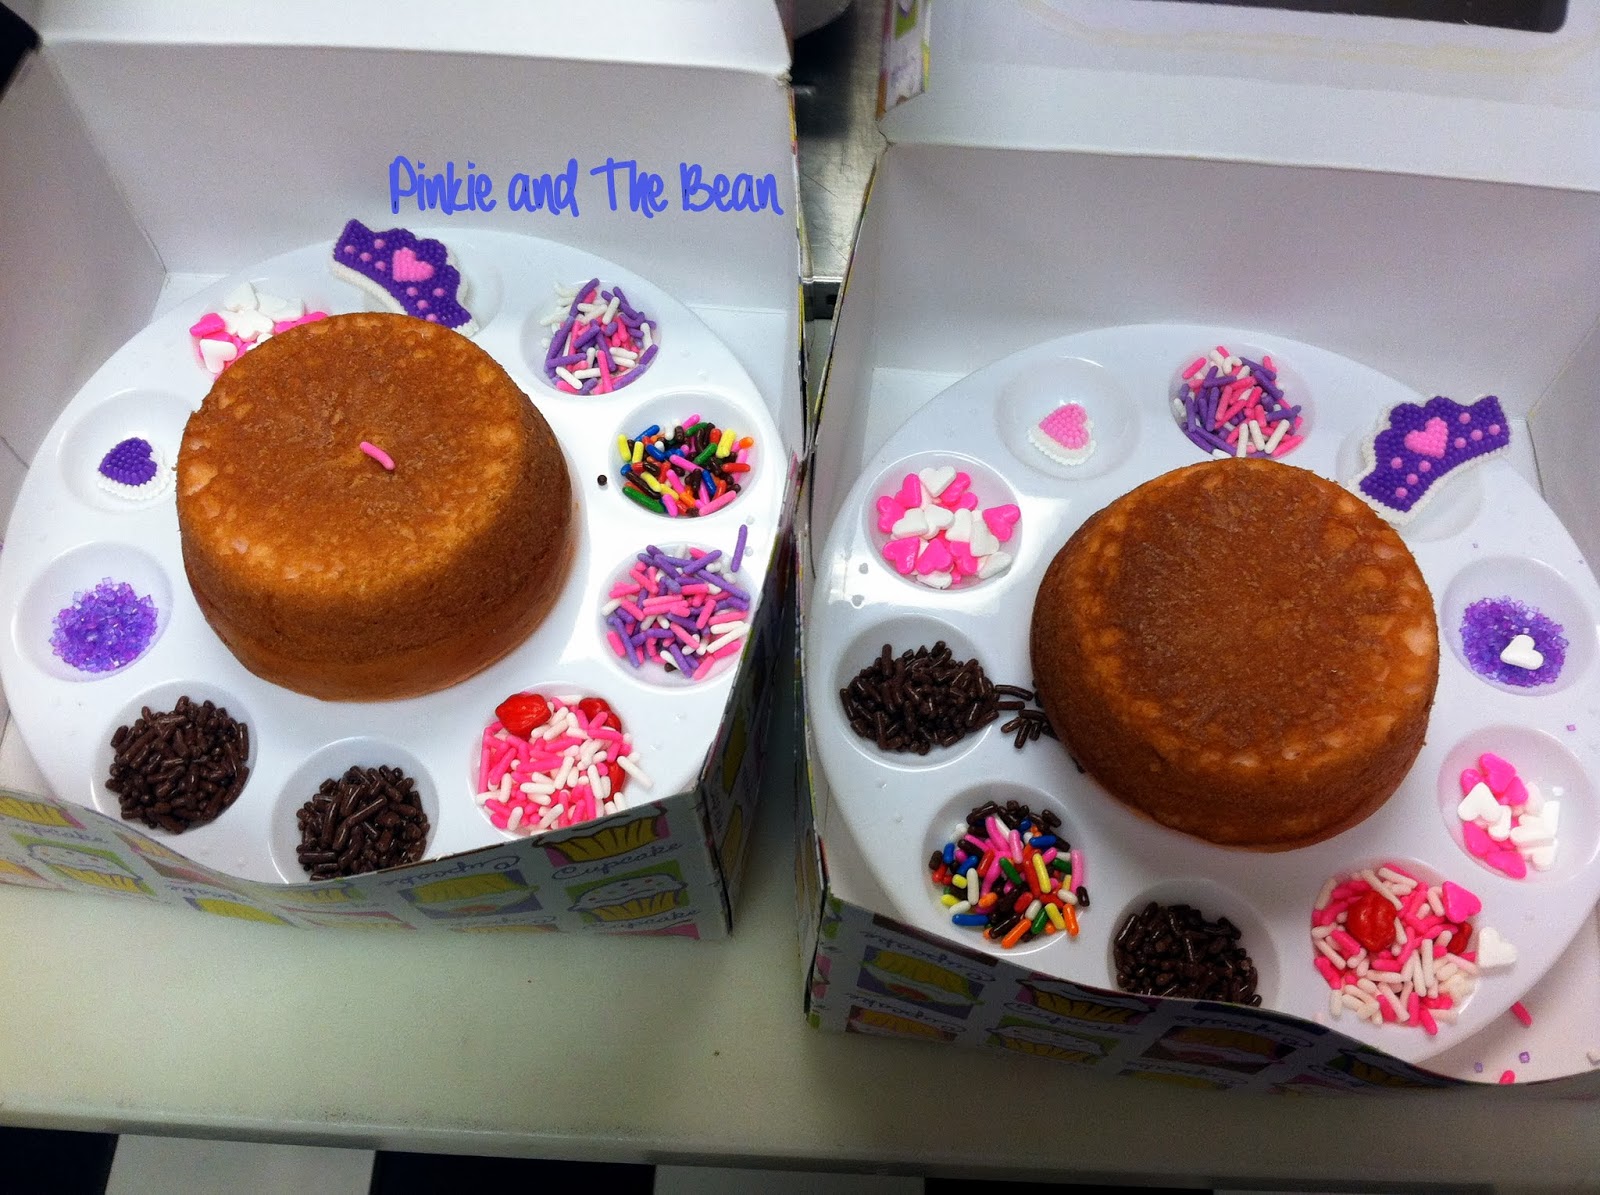


 As you can see Princess Bean really enjoyed decorating her cake.


 I loved these floral arrangements found on Pinterest so I made my own version.  I painted the inside of some of Hubz' mason jars and made rolled felt flowers.  I will have a tutorial on how I made these shortly.


The princesses made princess bookmarks and colored princess posters I found at ConsumerCrafts.com.  The princesses got to take home their cake creation, and the bookmarks and posters.  These all served as the "goody bag".

I used the "Now We Are Six" sign that I made earlier to decorate the gift table.


 This was a totally fun party!  I think all of the little princesses enjoyed it.  I need to thank the beautiful Princess Hannah for helping me keep all of the royal guests entertained that day, Princess Melanie for helping me find the location and set everything up the night before and with the dreaded clean-up after, and also a thanks to Princesses Kimberly, Ashley and Justina for chipping in, too.  And of course King Hubz for all his manual labor.  You all helped to make Bean's 6th Birthday the best!

****
I'm linking up at the following parties.  Please stop by.

SugarBee Crafts
Funky Polkadot Giraffe
AtoZebra Celebrations
Twirl and Take a Bow @All Things Heart and Home 
The Thrifty Home
My Girlish Whims
Gingersnap Crafts
Seven Thirty Three Inspire Me Wednesdays
Free Pretty Things for You Pretty Wednesdays
Made to Be a Momma


Tuesday, December 17, 2013

Peppermint Candy Cane Playdough Gifts


Peppermint Candy Cane Playdough
We made some peppermint candy cane playdough gifts for Bean's classmates. I followed this recipe shared byCribWithAView.com.

Making play dough is relatively easy and almost pain free.  It can get a bit messy especially when once again someone forgets to add the red food coloring into the batch or tries to add it in later and then shoves their hands right in to start kneading.  If you happen to do that, do not be alarmed by the sight of your hands later on.  Those really are not third degree burns.  It's  just food coloring and it will eventually wear off.

I used the Avery.com Design and Print Online site to make these really cute labels.  If you would like to use these, click here for a free printable.


We used Glad containers and added the labels to the top.

One down, 87,934 more to go!


Friday, October 25, 2013

Get on your broom and ride!

Witch's Broom Revamp


This Halloween Bean wanted to be a witch.  I have no idea why because she doesn't watch anything with witches in it.  But I was just glad she didn't pick out anything that reminded me of Hooker Spice so I was fine with the witch idea.

We went off to Party City in search of an acceptable witchy costume and Bean found one called Miss Matched Witch.  It is all different colors (my fave) so of course that was the one.  She also wanted a broom to go with the costume.

We found one but thought it was kinda plain.

No fear!  Mommy can slap some crap on it and call it pretty!

Excuse the pictures because 1) I remembered I needed to pretty it up around 9pm the night before she needed it for her school carnival and 2) do you know how hard it is to take a picture of a long, tiny broom?  It's hard.

I started off by spray painting the entire broom black.  At this point I wasn't really sure what exactly was gonna get slapped onto this thing so I figured I might as well spray paint the whole thing.  I used Krylon Short Cuts in black because I knew I didn't need a whole bunch of paint.  Then I sprayed the bottom part of the broom (what's that called?  The wiskers, wisk, part I don't use much?) with Krylon Glitter Paint.

Can I just stop a moment and tell y'all that I have found my new best friend in this Krylon Glitter paint?  It is amazeballs and I love it.  This weekend I think I'll spray it on everything in my house.  Maybe even the dogs.

Pardon this crappy picture.
God's gift to glitter lovers.
Thank ya, Jesus!
After all that fabulousness dried, I wrapped the handle in wide purple satin ribbon.  Then I used this cute Trick or Treat ribbon to dress it up.  This ribbon really goes well with Bean's costume.


Eat Rick?  Is this Walking Dead ribbon?
It still needed something more than paint, glitter and ribbon, I thought.  So I wrapped the top of the wisky part with orange baker's twine.


This is the best picture I could get of the finished project.  I know you can't see the whole thing but just use your imaginations, kids.

Ready to ride.
When I showed it to Bean the next day, she loved it.  And here is the Miss Matched Witch herself enjoying her new ride.


Monday, January 21, 2013

DIY Art Party Paint Can Favors


This weekend we had Bean's 5th Birthday party.  (Excuse the sobs.)  Bean decided to have an art party this year.  Okay, okay, I decided we'd do an art party.  I knew Bean would love it and I thought it would be something different than Monkey Cheese's or whatever.

I found a local art studio that offers birthday parties.  Kids can come in and learn to paint a picture on a canvas and then they get to "bedazzle" their work.

Since it was going to be an art party, I wanted the goodie bags to go with the theme.  Some of you long time readers might remember my past rant about goodie bags.  I am learning though that they don't have to be a bag of plastic trinkets or sugarey candies.  I think this year's incarnation is a good example of that.

If you're going to have an art or paint party, what do you think of?  Massive amounts of mess?  Okay, right.  What's the next thing you think of?  Let me just give you the answer, okay?  PAINT CANS.

I found these clear ones at OrientalTrading.com.  They are 5" tall.


We wanted them to be colorful so we picked several colors of construction paper and cut it to fit inside the can.


(Can you see my little helper in the background?)

After the pieces were cut to size, Bean would roll them up and place them inside the cans.


(Do you also see the lasting effects of a green lollipop on her face?  Even helpers need a pick me up, I guess.)


Then it was time to fill the cans with our goodies.  We wanted to give out art supplies so that our friends could have something they can use over and over, at least for a little while.  We looked at several stores and either couldn't find anything we wanted to go along with our theme or the cost was too much.  Finally, Hubz saved the day while at Wal-Mart.  I had been looking at some Crayola products and the cost was over a $1.00 per box.  I love Crayola products and we have plenty of them.  But we were throwing this party on a budget so we had to be careful on the cost of the goodies.  Hubz found some boxes of Rose Art crayons and chalk that were much less than the Crayolas.  I've seen RoseArt around for some time but frankly, I consider Crayola to be the best.  But let's face it, by the time you get these crayons in the hands of a 4 or 5 year old, or by the time they are shoved up someone's nose, or ingested by the dog, does it really matter?  I can tell you from my own personal experience that the doctor will not give you back your crayon after he extracts it from your nose.  Sanitary concerns or some mumbo-jumbo like that.

Once we got everything home though we realized the boxes of chalk were too wide for the cans.  We decided on just putting a few pieces of chalk in the cans instead.  For the girls, Bean also picked out some stickers and a lip gloss ring.  For the boys, we chose Matchbox cars and sticky frogs.  And of course, a goodie bag wouldn't be complete without some kind of candy so everyone also got a few Hershey Kisses.


Once the cans were filled and the tops put on, I cut some ribbon and tied it to the handle and made pretty curls.


The labels were made using some pre-made scalloped labels found in a kit called Multi-Brights from Lilly Bimble and clip art from Creative Kids by Miss Pickle's through the MyGrafico.com site.  I uploaded the labels to PicMonkey.com and added in the names and clip art.

***Update***  The Creative Kids by Miss Pickle's is no longer on the MyGraffico site but you can purchase the clipart on Miss Pickle's Etsy store.  She now has a Bright version and a Pastel version.


I printed these labels on full sheet mailing labels.  I'm not sure if that's how the professionals do it or if they use actual sticker paper but I will say that using the labels made made taking them off a lot easier.  They did not try to stick to the cans at all.

For the finishing touch, we added a paint brush also found at OrientialTrading.com.  These were stuck on the cans with 3D Glue Dots.  I can't say that those dots are easy to remove later on though so just be prepared for a fight if you ever want to take the little suckers off.


Bean loved them once they were all done.  I loved how colorful they all turned out and they were a big hit at the party.  A couple of moms asked me if the art studio put them together for me.  They were a little surprised to find that we had made them ourselves.  We are available for hire in the future!  Just putting that out there.


Photo


I will be linking to the following linky parties:

Take-A-Look Tuesday @Sugar Bee Crafts

Mums Make Lists

Too Cute Tuesday @Funky Polkadot Giraffe

Whatever You Want Wednesdays @Free Pretty Things for You

Show Off Your Stuff  @Fireflies and Jellybeans

Hooking Up with HOH @House of Hepworths

A Crafty Soiree @Yesterday on Tuesday

The Artsy Girl Connection

Things I've Done @Bear Rabbit Bear

Share It Friday @Melomomma

Kitchen Fun with My 3 Sons

Mop it Up Mondays @I Should Be Mopping the Floor

Motivate Me Mondays @Keeping It Simple

Tuesday, December 4, 2012

Our Advent Calendar - 2012

Last year for our advent calendar, we opened a new Christmas book each day.  That was a fabulous idea but I did not want 24 more Christmas books this year.  I'm still finding books I can't remember ever reading.

This idea was found on Pinterest and is an original from Martha Stewart.

http://www.marthastewart.com/270492/baby-sock-advent-calendar

Martha used baby socks and I'm sure all were brand-spanking-new, too.  Well, I'm no Martha!

Yes, I used some socks that we have actually had on our feet.  But they are clean.  It's not like I just took it off my foot and said "hey, you know this would look (and smell) real purty hanging on the fireplace".  I only say that about my underroos!

We also threw in some baby mittens in our version.  Take that, Martha!

Bean had fun putting the Hershey Kisses into the socks and mittens while I punched out the advent numbers. I found these by Living Locurto and printed them out.


We had already painted our clothespins white and had some red ribbon on hand.  We hung the socks and mittens up under our mantle.  This really turned out so cute and Bean loves it.


Thanks again, Martha, for the inspiration!

Friday, August 10, 2012

Updating Bean's Decor

I think about a year ago, maybe two, who's counting...I posted a picture of this table and chairs one of my bosses gave me to have for Bean.  I knew immediately I wanted to re-do them.  I mean if you like the art-school-student-on-a-drunken-binge look, hey these were made for you.


I, however, am not a fan of such a look.

So I went and bought some paint at the lovely Home Depot.  That was almost a year ago.

So if we are following along the timeline of this project, we got the table and chairs two years ago, bought the paint a year ago, and now I have finally decided this look has to go!

So I pulled the table out onto the back porch, right next to The Redneck Pool, and started sanding.  By hand.  My hands.  Using sandpaper.  Whodathunkit?

This is what I got so far.


So I've gotten rid of the shiny surface along with the fact that all my fingernails have now be sanded down too.  I stopped because I had to make dinner and frankly, I wasn't sure what the next step was.  I figured I needed to get all the sanded stuff off but.....?  Yeah, what's the right way?  I emailed a friend to make sure I was proceeding correctly.  I also tried to call and text Hubz.  He couldn't be arsed.  Evidently he does not understand the urgency of this craft project.  Men.

Then since I was outside for probably the first time all summer and we all know I'm made of sugar, rainbows and lollipops, a mosquito bit me.  On the eyelid.  Who does that?  All of this creamy jiggly whiteness available to it and it goes for the eyelid.  Ass.

So I had had enough.  Crafting was done for the day.

So my next step is to sand the chairs and then dust everything off and wet it all down a little.

And apply bug spray.

I'll keep you updated as long as my interest stays on this project.  If it doesn't, forget you ever read this.

Thursday, August 9, 2012

DIY: Redneck Pool

I thought I'd share this extremely helpful tutorial we came up with on beating the summer heat.

We do not have a pool.  We are not encumbered with monetary gains sufficient enough for such a recreational accessory.  (Like that? I used all the big words I could and I hope I used them all correctly.)

Yep, we be broke.

So when it's hot outside and you be broke like us, you have to invent ways to cool off.

Enter my brand new DIY idea - THE REDNECK POOL.

Here's what you need for such an undertaking of these magnanimous proportions.  (I'm going with that but I might not have used all those words correctly.  Such is life.)

1)  Galvanized tub - this one may or may not normally be used to wash our beloved doggies in.  If you don't see any problem with that, then yes, we use it to wash the dogs.  If you think it's gross, we've never washed a single animal in there and we never would.

2)  Water.

3)  Willing test participant.

Throw them all together.  Mix thoroughly.

Voila!

THE REDNECK POOL is born!


Enjoy the remaining days of summer!